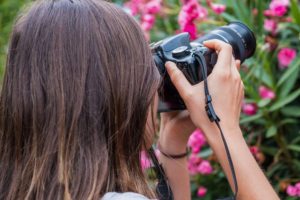
Flower photography, with its intricate details and vibrant hues, is both an art and a science. For many, the pleasure of capturing spring flowers comes from the challenge of capturing nature in its raw, delicate form.
But with the right camera settings for flower photography, this challenge transforms into an opportunity to create breathtaking imagery. Whether you’re a novice looking to photograph flowers in your backyard or a seasoned professional venturing into macro flower photography, knowing your camera settings is basic.
The magic of flower photography is in the precision. But, like all art forms, achieving this requires a blend of technique, knowledge, and a splash of creativity.
How Does Lighting Affect Your Flower Photography?
In any flower photography tips, lighting inevitably tops the list. The best camera settings won’t do much if your lighting doesn’t do justice to your subject. With its soft, diffused qualities, natural light can elevate a good flower photo to an outstanding one.
Golden hour, shortly after sunrise and just before sunset, is often hailed as the prime time for flower photography. This period bathes flowers in a warm, ethereal glow, highlighting their delicate features without causing harsh shadows. But even outside this window, with the proper techniques, natural light can still be your best ally.
While natural light is fantastic, it isn’t always enough, especially when delving into macro flower photography. This is where your equipment, like a macro lens, saves the day. A macro lens captures intricate details often missed by the naked eye. So, when combined with optimal lighting, it creates strikingly detailed images.
How Can You Choose the Right Lens?
Another essential tool in flower photography is your lens choice. In fact, it influences your understanding of lighting and camera settings. The lens you use may dramatically affect your flower photos’ focal point, depth, and overall feel.
So, a dedicated macro lens is your best friend for those delving into macro photography. Such lenses are explicitly designed for close-up professional photography. It allows photographers to capture minute details of flower petals, dewdrops, and textures that other lenses might miss. A macro lens lets you fill the frame with the beauty of an entire flower or even just a portion of it, creating intimate and detailed images.
But what if you don’t have a dedicated macro lens or prefer to shoot flowers from a distance? That’s what the telephoto lens is for. While often associated with wildlife and sports photography, telephoto lenses come in handy in flower photography. They improve background compression, making the entire flower pop and stand out. The benefit of this is that the flower remains the focal point of your shot.
Even a compact camera can produce fantastic flower photography for hobbyists or those without a DSLR. Many modern compact cameras come with a close-up or macro mode, enabling photographers to take relatively detailed close-up images. Remember, it’s not always about the gear but how you use it.
Camera Mode Settings
Mastering your camera’s mode settings significantly elevates the quality and impact of your flower photos. Different scenarios and aims require different adjustments. Let’s break down the essential settings and techniques you need to be familiar with when photographing flowers:
Focusing Techniques
Manual Focus
In flower photography, particularly in macro shots, manual focus often reigns supreme. The complexity and layers of flower petals may confuse autofocus systems. When you use manual focus, you can pinpoint the desired focal point and make it razor-sharp, allowing for precision where it matters most.
Shutter Speed Dynamics
Fast Shutter Speed
A fast shutter speed is essential to freeze motion like a gentle breeze moving a flower. This ensures clarity and prevents motion blur, capturing the subject in pristine detail.
Slow Shutter Speed
While this might introduce motion blur if not handled correctly, a slower shutter speed may artistically convey movement or enhance low-light photography. However, camera shake is risky, especially in macro shots where slight movements are magnified.
Advanced Macro Techniques
Focus Stacking
An advanced method is especially useful in macro photography. This involves photographing the flowers at different focus points and merging them during post-processing. The result? An image with exceptional sharpness throughout, from the closest petal to the furthest.
Stability and Preventing Camera Shake
Even the steadiest hands sometimes introduce a camera shake, which is particularly evident in close-up photography. Using tools like tripods or techniques like holding one’s breath during a shot or using a camera’s timer function mitigates this and produces clearer shots.
What Does ISO Mean?
ISO refers to your camera’s sensitivity to light. Whether using macro lenses, a DSLR camera, or even a compact one, understanding ISO is fundamental when photographers shoot flowers.
Bright Sunlight vs. Golden Hour
A lower ISO (e.g., ISO 100 or 200) works in bright sunlight because there’s an abundance of light. This setting reduces the chance of noise or grain in the photo, leading to cleaner, pin-sharp images.
On the contrary, when the light is soft and diffused but dimmer during the golden hour, you might need to increase the ISO to capture bright colors. All without compromising shutter speed or aperture.
Artificial Light
A higher ISO might be necessary when shooting under artificial light, especially if the light source is not particularly bright. But beware: higher ISOs introduce noise. So, always balance this setting with your available light and desired effect.
Mastering Aperture for Depth of Field
The aperture controls the opening size in the lens through which light enters the camera. It also impacts the amount of light hitting the sensor. And it plays a significant role in determining the depth of field in an image.
Macro Lenses and Depth of Field
Macro lenses, loved for their ability to focus closely on subjects, often have a shallow depth of field, especially at wide apertures. This means that while the entire flower might not be in focus, you can achieve pin-sharp focus on specific parts like the stamen or a single petal. This effect leaves you with a beautifully blurred background.
Wide Aperture vs. Narrow Aperture
A wide aperture (e.g., f/2.8 or f/4) results in a shallow depth of field. Thus, it’s excellent for isolating your subject against a blurred backdrop. This is especially effective when using a wide-angle lens, where the maximum focusing distance is short. On the other hand, a narrow aperture (e.g., f/16 or f/22) will keep more of the scene, from the foreground to the background, in focus. This is particularly useful if you want the entire or multiple flowers in focus.
Stability and Aperture
It’s crucial to keep the camera steady, especially at narrower apertures, where less light is coming into the camera. Any shake leads to blurred images. Consider using a tripod or other stabilization methods to ensure sharp captures.
Consideration of Light
Adjusting the aperture also influences how much light reaches your camera’s sensor. A wide aperture lets in more light, ideal for dim conditions or during the golden hour. In contrast, a narrow aperture, beneficial in bright conditions, allows less light.
Thus, always balance your aperture setting with the lighting condition. It doesn’t matter if it’s the golden hour’s diffused light, the bright sunlight of midday, or the controlled environment of artificial light.
White Balance – Getting the Colors Right
Every light source has a color temperature, whether it’s the midday sun, the golden hour’s glow, or an artificial lamp. White balance ensures that what you perceive as white in real life is rendered white in your photographs, making colors appear natural.
Natural Light and White Balance
Light tends to be warmer during the golden hour, giving subjects a golden hue. While this is appealing, there might be instances where you’d want to neutralize this warmth. Adjusting the white balance to compensate for the color temperature gives you more accurate colors.
Artificial Light and White Balance
The color temperature varies widely when using artificial light or trying to bounce light onto your subject. Most photographers will adjust their white balance settings to match the light source, ensuring that colors, especially the vibrant hues of flowers, are rendered correctly. That way, they can create photos worthy of being in photography galleries.
Camera Gear and White Balance
While many modern cameras have impressive automatic white balance capabilities, sometimes manual adjustments are necessary, especially in mixed lighting conditions. Tools like gray cards help photographers achieve accurate white balance during post-processing.
Creative Techniques
Sometimes, altering the white balance introduces interesting effects. For instance, using a spray bottle to mist a flower and then adjusting the white balance to a cooler setting creates a dewy morning effect, even if the photo was taken at a different time.
Aperture, Focal Length, and White Balance
Remember that depth of field, influenced by aperture and focal length, can also affect an image’s white balance. Different focus points and blur levels impact how color is perceived, especially against backgrounds that may influence the overall color temperature of a scene.
Composition and Framing Techniques
Composition is arranging elements within a frame to create a compelling photograph. When it comes to flowers, understanding framing techniques elevates a simple shot into a captivating image.
The Rule of Thirds
Divide your frame into nine equal sections using horizontal and vertical lines. Place the main subject of your flower photo at one of the intersections. This positioning often feels more natural and balanced to the viewer.
Aperture and Depth of Field
Choosing a large aperture creates a shallow depth of field, blurring the background and making the flower pop. On the contrary, a smaller aperture focuses more on the scene, which can be ideal when showcasing a flower within its natural environment.
Using Color
Contrasting colors make your main subject stand out. If you’re photographing a vibrant red flower, for instance, framing it against a green backdrop intensifies its visual appeal.
Filling the Frame
Sometimes, getting extremely close to your subject and filling the frame leads to striking results, emphasizing the textures and details of the flower.
Leading Lines
Use natural lines, like the stem of a flower or surrounding plants, to guide the viewer’s eye toward the main subject. This technique creates a sense of depth and draws attention to the primary focus of your image.
Bottom Line
Flower photography, with its intricate details and vibrant hues, beckons novice and seasoned photographers into its captivating realm.
Whether chasing the perfect golden hour glow or trying to capture the dew-kissed petals up close, remember that every flower tells a story. With the right tools and techniques, you can become its storyteller. So, gear up, step out, and let the world of flowers unfold through your lens.